Jane Seymour's Updo Hair Style

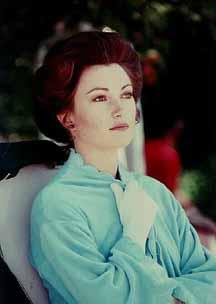
Creating Jane Seymour's Updo from the Romantic Movie Somewhere in Time
I am not an advocate of teasing or backcombing. It does provide the hair with some body that is necessary with some styles, but comes at the expense of roughing up the cuticle of the hair shaft, causing damage if done on a frequent basis. To me, it is not a good way to achieve volume. If your hair has some natural thickness or texture, this may be all you need to get the fullness that looks so neat in Jane Seymour's Somewhere In Time hairstyle.
If you want some ringlets to frame your face, you need to separate those areas out first. The area of your hairline, above and in front of your ears, should be able to be divided into two sections for tendrils coming down from those areas. If you also want one from each side, coming from behind your ears and then laying on you shoulders or in front of your shoulders, you can separate out a section from that area also. You may need to temporarily clip these sections so you don't gather them up with the rest of your hair to do the rest of the style.

However it is easiest for you, brush all the unsectioned hair up to your crown area. Have a coated elastic ready. ("Scunci" makes some with no metal connectors). Tie your hair off into a ponytail about 1-1/2 to 2 inches above your scalp. Grab the tied area of your ponytail and push it down to your head and you should see all the hair that was brushed to the crown loosen up and give some nice volume all around your hairline. You can experiment with the placement of the tie band (by moving the band closer to your head or farther away) to give you more volume or less depending on the look you want.
Once you have the amount of volume you like, bring the ponytail back up above your head, twist the tail and begin wrapping it around the banded area. You will probably have the bun laying on your head at this point. The volume or fullness should be still be there. Continue twisting and wrapping the tail until you have it all wrapped around the base of the bun. You can do a flat bun, or by wrapping the hair somewhat tightly around the base of the bun, the very first coils will pop up and project up higher out of the bun. Now take quite a few hairpins and secure the bun and the end of your hair (which is tucked into the bun) to the crown hair. You can also experiment with the placement of the bun by moving it forward or back from the crown area for the effect you like best.
Celebrity Hair Styles


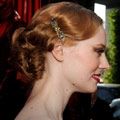
Take your sectioned out "tendril areas" areas and and roll them on some foam rollers, using some mousse or setting solution to help hold the curl. You can use a curling iron, but be sure to use some 'heat protectant' product to avoid heat damage. You should have some nice curly tendrils that help frame your face. For a less curly effect, use larger rollers or less styling product.
Some hair sticks, a decorative comb or some "Babys' Breath" stuck into the bun add a nice touch to the finished style.